Showing posts with label machine knitting. Show all posts

Wednesday, December 24, 2008

A knitting-loaded post


It's time I updated my knitting progress here. I have two projects officially on-the-go at the moment, but I digressed yesterday with some baby/kid hats to give to my neighbour who's due to have a boy in a few weeks.

I've started a red sweater with very cheap acrylic yarn. It feels soft enough so I'm hoping that I don't do all the work then regret it! It'll be a seamless bottom-up one, as per Elizabeth Zimmermann's books, knitted in a K4, P1 rib. Raglan sleeves. Big foldover collar. I hope.


The first blue sock (elann esprit) is nearly done - just the toe shaping to go, along with some woolly nylon for reinforcement.


Yesterday afternoon, after I had finished all the cleaning, I spent a while in my sewing room downstairs (I should probably rename it my "knitting room" as I knit more than I sew these days). I ran up this hat - used the Bond to make a rectangle about 18 inches wide by 12 inches tall, leaving the live stitches to be picked up top and bottom with knitting needles. I knitted a crown on each end, sewed up the side seam, pushed one half inside the other and, presto, a double thick hat.


And in the evening, I went to knit night at my local yarn store. Feeling like a change of scene (yarn) I picked up a 100g skein of S R Kertzer's Northern Worsted in a variegated blue and started another hat. This time, I used a loop and crochet hook to start with 6 stitches, transferred them to a circular needle, and magic-looped my way around the crown of the hat until the increases were done and I could change to a 16 inch circ (thanks to Denise interchangeables)! After a couple of inches of straight knitting, I switched to garter stitch, added some short rows at the back, and it was done.....at 1am this morning.


There's enough yarn left on the skein to make a pair of thumbless baby mitts, I think, so that's what I'm going to do as soon as I get the chance.

That photo at the top is the pile of knitting library books I currently have. It's good to have a stack of these around while they're closed over Christmas.


And this is a pretty blue glass "bowl" which a friend of mine gave me today. I decided it would look nice on my coffee table with small balls of leftover yarn in it. (Better than a flower arrangement - no water required.)

Saturday, October 25, 2008

A new toy

I have had my eye on one of these for a long time....


I first saw them online. They also have them at my local yarn store. The local price (in Canadian dollars) was quite a bit more than the US dollar price online, but once I did the conversion and factored in a bit extra for shipping and charges as it came over the border, I decided to just buy it from the shop in town and support my LYS.


I knew that Lego Nut would love to play with it! We tested it out with some plain Bernat sock yarn (it only takes lightweight yarns, though I'm going to try out different thicknesses to see how they work).

Now to come up with some imaginative ideas for yards and yards of i-cord!

Wednesday, October 8, 2008

Socks and weaving


I haven't made socks in a while, but this skein of Berroco Comfort Sock yarn was languishing in my sewing room, so I decided it was time to take the plunge. It always seems to need that extra bit of enthusiasm to start something knitted on such skinny needles. I am even going to put aside my natural laziness and rib the whole leg, and maybe even the instep, to give these socks a bit more "hug". It's a little slower than plain knitting, but I think the result will be worth it.


This odd piece of work was an experiment that my brain came up with one night as I was lying there, waiting for sleep. I used some brown Bernat Satin, knitted up a rectangle on my Bond knitting machine at a large gauge, then used lengths of Lion Brand Homespun to weave back and forth through the stitches.


It was enjoyable to do on a small piece like this, though I certainly wouldn't want to tackle a large project using this method!

Saturday, October 4, 2008

Doris's throw


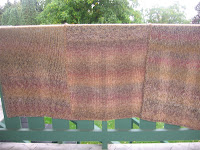
My friend Doris is going to be 80 next Saturday. ( I hope she doesn't read my blog as her gift won't be a surprise.) I spent one evening and one afternoon making this throw. I love this shade of Homespun - I want to make something for myself with it now!


Doris’s throw
Finished size approx 70 x 35 inches

This is a really “bare bones” pattern for those who are familiar with the Bond. I wanted to make it available on the blog, but also write it down for myself in case I want to make another in future.

Bond knitting machine: keyplate #4
Lion Brand Homespun 6 skeins (I used Sierra)
crochet hook 6.5mm
darning needle

Gauge: about 9.5 sts and 15 rows to 4 inches

Cast on (e-wrap) every other needle 50 sts
Knit 150 rows
Bind off using needle and backstitch method

Make two more panels the same way

Lay panels out on the floor, all cast on edges at same side
Flip middle panel over so that the reverse stockinette side is showing
Use a crochet hook and single crochet (double crochet in UK) to join panels together - **work into 3 sts, skip one** across (I used wooden clothes pins to hold the edges together)

Crochet around whole edge in sc (dc) - at the corners, work 3 sc (dc) into corner st

At top and bottom edges of pieces, work 1 crochet st into each knit st
At side edges, work 3 crochet sts for each 4 knit sts

Then crochet around whole edge in double crochet (treble in UK) - at the corners, **2 dc (tr), 1 ch, 2dc (tr)** into corner st

Machine wash (delicates) and dry (low heat) to soften throw and minimise curling

Friday, September 12, 2008

"One-night-stand" wrap


One night with your Bond knitting machine is all you’ll need for this wrap.

You’ll need:
Three skeins of Lion Brand Homespun (this is Candy Apple)
a 6.5mm crochet hook
a large-eyed darning needle

Set up your Bond with a #4 keyplate. My gauge was about 9.5 sts and 15 rows to 4 inches.

Push out every other needle across the machine (50 needles) and, working from the left and starting with a slipknot, e-wrap cast on 50 sts.

Hang the weighted hem, push the needles back into working position and, starting with the carriage on the right, knit 250 rows. Change to a new skein when necessary (I found one skein lasted about 100 rows). Rehang the hem when your work hits the floor! I counted my rows in sets of ten, writing them down as I went - if you have a row counter, then it’s even easier.

Bind off using the backstitch method. Cut the yarn leaving a length about three times the width of your knitting. Thread up a darning needle and use a back-stitch-type motion to bind off all stitches loosely.

The knitting part took me no more than an hour.

With the crochet hook and starting near a corner, single crochet (double in UK) around the wrap, working 1 st between each row along the sides and 1 st between each st along the ends. Crochet over the yarn tails as you go (the tails that were left when you changed to a new skein). At the corners, work **1 single crochet (double crochet in UK), 2 chain, 1 single (double)** into the corner st. When you get back to where you started, slipstitch (single crochet in UK) to join to the first st and fasten off. Weave in tail.

The crocheting took me about an hour too.

It’s a wrap!

A date with my Bond

I felt like a change of pace this evening. I spent some time with my knitting machine and completed a whole project in a couple of hours. I have typed up the pattern but need to photograph the finished item, so you'll have to wait until tomorrow to see it.

Project monogamy is not for me! It's good to have more than one project on the go: a simple one/a more complicated one, a portable one/a bigger project to keep your lap warm on the sofa, one on skinny needles/one on big needles. It keeps things interesting and guarantees that you'll never be without something to keep your hands busy.

See you tomorrow!

Saturday, April 5, 2008

Three hour shrug


I wrote up the pattern for this Three Hour Shrug for Ev of Strings 'n Things as it was her hand-knitted shrug that was the inspiration for my machine-knitted version. So here's my pattern. The sleeves are three-quarter length.

I used three skeins of Red Heart Soft Touch (I think they are 140g each) [worsted weight] on my Bond Classic, Keyplate 2. My gauge was 18 stitches and 25 rows to 4 inches.

Cast on 49 stitches with waste yarn. Knit a few rows, then change to the main yarn. Increase at each side of work every fourth row until there are 99 sts. (100 rows)

Knit straight for 125 rows.

Decrease each side of work on next row and every fourth row thereafter until there are 49 sts. Knit 3 rows even, then knit a few rows with waste yarn.

Remove work from machine. Pick up the live sts at one end with a #7/4.5mm needle, knit 6 rows of garter st for cuff. Repeat other end.

Seam sleeves for 15 inches or whatever fits you best.

(I was thinking of adding a border to the st st edges around the body, but actually the curling seemed to work well at snugging it around the body so I didn't do it.)

My Bond Buttonhole Bag

This Bond Buttonhole Bag uses Phentex chunky acrylic in a colourway called Rustic Rouge.

The yarn is very soft, made in Canada (that's a plus) and combines shades of pink, cinnamon and chocolate. I had a thought in the back of my mind that I wanted to make something for my mum's birthday in March, and a bag seemed like something she'd use.

This project didn't even get into my Ravelry queue, it went from idea to "finished object" so fast! As the handle is formed like a buttonhole, I have used that in the name, and I hope I'm not breaching anyone's copyright.

1 x 300g skein Phentex Chunky acrylic yarn
(this may actually be enough to make two bags)
Keyplate #3 Bond Classic knitting machine
6mm crochet hook
My gauge was approximately 15.5 sts and 21 rows to 4 inches

Cast on to 58 needles with e-wrap. Starting with carriage at right, knit 6 rows.

Next row - with carriage on right, push the centre 16 needles towards you into forward holding position. Knit the first part of the row, stopping when the carriage reaches the centre. Lift the keyplate out of the carriage and slide it to the left, out of the way, while you bind off the 16 stitches in the centre. Make sure the last stitch bound off is transferred to the live stitch to its left, leaving those 16 needles empty.

I bound off using the transfer tool and the basic instructions in the instruction book. Push the centre needles back to non-working position. The yarn is then coming from the correct place to continue knitting the row. Move the carriage back to the centre, replace the keyplate and knit the rest of the row. Carriage is now on left.

Take a short piece of yarn (if you’re knitting from the centre of the ball, snip it from the outside tail) and e-wrap cast on to the 16 needles in the centre. Hang a small weight onto the end of the yarn. Leave the needles in forward working position with the latches open, so they will knit.

Knit 110 rows. For the first couple of rows after the hole, push the centre needles towards you into forwards working position so that they knit easily, then hang a weight (I use a bulldog clip with a magnet for extra weight).

Repeat the two “buttonhole” rows, then knit 6 more rows. Bind off.

Weave in yarn tails either side of the holes, adding a couple of reinforcing stitches for strength. Sew or crochet side seams (I used a 6mm crochet hook to single crochet along the outside of the bag).

Floppy Rabbit


Floppy Rabbit was made for a friend’s 1 year old twins. It was inspired by a rabbit that my sister was given as a child - I still remember it - I loved its long legs.

I used Bernat Soy (50% soy 50% acrylic, medium weight). I didn’t start with full skeins, but I expect you could knit this with one skein each of the oatmeal, seasalt and celery. Or just make it all one colour.

I used Keyplate #2 on my Bond Classic knitting machine. I made it up as I went, with no gauge swatches or measuring, so feel free to adapt it as you wish. My toy measures about 27 inches tall. The arms seem just right, being about the length of the body, and the legs are extra long, on purpose.

Body

E-wrap cast on 50 in blue, hang hem
Knit 35 rows blue
Knit 25 rows green
Bind off (I used the 'sewn with a darning needle' method)

Head

E-wrap cast on 40 in white, hang hem
Knit 40 rows white
Bind off

Ears (make 2)
(with hindsight, these could have been bigger, or you could make 4 and sew them together in pairs to stop them from curling in)

E-wrap cast on 4 in white
Knit 2 rows, add weight (I use a bulldog clip with a magnet attached for such a small piece of work)
*Carriage on right, push a needle out to working position on carriage side, knit a row (one stitch increased)
Carriage on left, push a needle out to working position on carriage side, knit a row (6 stitches)
Knit 2 rows
Repeat last four rows (from *) until there are 14 sts, ending with the two even rows.
Knit 14 rows straight.
**Carriage on right, transfer the stitch on the right end to the needle on the left, knit a row (one stitch decreased)
Carriage on left, transfer the stitch at the far left to the needle on the right, knit a row (12 stitches left)
Knit 2 rows
Repeat last four rows (from **) until there are 4 sts left.
Bind off.

Arms (make 2)

E-wrap cast on 20 in white, hang hem
Knit 10 rows white (for “paws”)
Knit 40 rows green
Bind off

Legs (make 2)

E-wrap cast on 30 in blue, hang hem
Knit 90 rows blue
Knit 7 rows white (for “shoes”)
Bind off

Sew around all pieces, stuffing gently as you go. I made sure my seams were on the centre back of the head and body and the underside of the limbs. When sewing up the head and body, I rounded the corners a little. Sew the head and limbs to the body, and the ears to the head. Embroider features.